Serpentine conversion tutorial...lucky I kept a copy, eh?

Walk throughs on modifcations

Serpentine conversion tutorial...lucky I kept a copy, eh?

Postby Rollin » December 20th, 2007, 5:56 pm

These are copies of my original posts from AFF ages ago, I just realised I had them, thought they might be of use (sucked in AFF, you want this info, you have to steal it like the scumbags you are)

............................................................................................................................................................................................


So I threw a serpentine belt setup on my car yesterday, and I thought I would take some photos and do a little writeup on the parts required, problems encountered etc to help others when they decide to do it.

Image

I got all my parts from an EF engine:

Image

I didn't end up using the metal bracing brackets, as some of them mount on the original exhaust (which I don't have obviously)


The benefits of a serpentine belt setup are:


Bigger alternator - 110A instead of 75A.
Simpler - Only one belt with an automatic tensioner, no adjustment/maintenence required.
More durable - 6 rib belt > pathetic 3 rib jobbie which runs the alternator and water pump on EA/D.
Looks - Increase the sexualness of a pre-EF engine bay by approximately 2000%*
NOTE: You must run thermofans with this setup.

*actual results may vary

Downsides:

Cost - pretty much none of the parts from the 3 belt setup are used on the serpentine one.
If the belt breaks you're stuffed - though the chance of that is much smaller than with 3-belt.
You must run thermofans with this setup.
Image

Look at your car. Now back to mine. Now back to yours. Now back to mine. Sadly, yours isn't mine. But if you stopped buying dodgy cars and bought an ED, yours could be like mine. Look down. Back up. Where are you? ...You're on BoostedFalcon, reading the signature your signature could be like! Anything is possible when your car looks like my car... I'm on a computer.
User avatar
Rollin
Melting Pistons
 
Posts: 7933
Joined: July 15th, 2007, 4:35 pm
Location: Brisbane - Driving around in a metal and glass case of emotion!
Has Liked: 327 times
Been Liked: 751 times

1994 Ford Falcon

Re: Serpentine conversion tutorial...lucky I kept a copy, eh?

Postby Rollin » December 20th, 2007, 5:58 pm

Parts required:


-XH ute tensioner - part number is EHC-6B209-A and they are very expensive new!

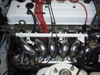
You can see in the picture below the difference between the EF tensioner and the XH one - the XH is on the right. You will notice the top pulley arm is 'kinked' to provide clearance from the belt to the tensioner when the compressor is mounted in the lower EA/D/XH position.

Image

-EF/L/AU Power steer pump. Alternately you can just buy the pulley and fit that to your existing power steer pump, but you must either have the special removing/installing tools or take it to a workshop to have it fitted. (any ford or holden dealer should be able to manage it)

-EF/L/AU Power steer pump brackets.

-EF/L/AU Alternator and bracket.

-EF/L/AU Water pump - It's possible to use a second hand one, but not advised, as it is very hard to get a decent seal in between the 'shim' and the pump once it has been removed from the original engine. I reused the EF pump I had because the intermediate gasket was still in good nick - I just carefully and painstakingly applied a layer of UltraBlue between the shim and gasket and used a new gasket between the pump and block...it's not leaking...yet...

-EF/L AC compressor. (AU is different and won't fit your AC pipes)

-EF/L/AU Crankshaft pulley.

-Lots of bolts - take everything you can from the motor you are getting the stuff from - one thing I noticed when doing this was there are a lot of very similar headed bolts, with varying lengths, so occasionally I would be putting a bolt in and it would bottom out before it was actually tight, so I had to remove that bolt and then a couple of others like it to find one that was a little shorter and also interchangable with the bolt that was too long.

(make sure you take note of which bolts came from where to help you when refitting)

-If you are keen, you can also fit an EF timing cover. I couldn't be bothered dropping the sump etc to replace mine, so I had to grind part of the alternator bracket and timing cover so they fit together nicely. The timing marks on the EF balancer are in a different place to the EB one so you will have to make sure your timing is spot on before pulling the car apart, then checking it again when you are done and marking the correct place on the balancer.

-You will also need a harmonic balancer puller of the 3 bolt variety (the ones with the 'fingers' will just destroy the old balancer and are useless for this application) and a lot of tools.

-Fresh coolant - Even if your coolant is only a few months old, its a good idea to replace it as there most likely would have been old sludge buildup etc that has been loosened by the few months of use with the new coolant.

-Either an EB/EF radiator hose adaptor and bottom radiator hose from an EF, or an entire EF radiator side tank and EF hose. I went for the adaptor setup because its a hell of a lot easier. An exhaust or machine shop should be able to knock this up for you for under $50. Make sure it is made of stainless steel so it wont rust, and try and get them to put a lip on the ends to help stop the hose coming off.

Image

- 2 extra hose clamps to suit the smaller EF hose

- 1 Power steering pump o-ring for the back of the pump

-XH drive belt (AU and EF are shorter and won't fit)
Image

Look at your car. Now back to mine. Now back to yours. Now back to mine. Sadly, yours isn't mine. But if you stopped buying dodgy cars and bought an ED, yours could be like mine. Look down. Back up. Where are you? ...You're on BoostedFalcon, reading the signature your signature could be like! Anything is possible when your car looks like my car... I'm on a computer.
User avatar
Rollin
Melting Pistons
 
Posts: 7933
Joined: July 15th, 2007, 4:35 pm
Location: Brisbane - Driving around in a metal and glass case of emotion!
Has Liked: 327 times
Been Liked: 751 times

1994 Ford Falcon

Re: Serpentine conversion tutorial...lucky I kept a copy, eh?

Postby Rollin » December 20th, 2007, 5:59 pm

How to go about it:


- Go to a workshop and get them to recover all of the gas from your AC system.

-Remove the thermofans and radiator (and airbox, throttle body ducting etc if you have it) to give yourself some space.

-Remove the negative battery terminal so you can't short anything out.

(make sure you take note of which bolts came from where to help you when refitting)

-Loosen the 4 bolts on the water pump pulley then remove all of the drive belts.

Image

-Remove the poweer steer pump and the bracket it attaches to.

-Remove the alternator and the bracket it attaches to.

-Remove the tensioner brackets for the AC compressor and the power steer pump. The bottom bolt is a Torx head, I think it's a T3- pr T35, I can't remember exactly.

-Remove the water pump pulley and the AC compressor, but leave the AC compressor bracket bolted to the block.

-Remove the water pump. (more water will probably leak out when you remove the pump)

-Clean the face the water pump bolts to really well, use a razor blade and fine sandpaper, then thinners/brakeclean and a rag to make sure it is perfectly clean and flat.

-Put the car in gear (manual) and the handbrake on to stop the crank turning, and loosen the crank bolt, remove it all the way then put in in about 5 turns by hand so the balancer puller has something to push off. Good luck auto owners - maybe you could convert to manual to make this easier :D.

-Fit the balancer puller and pull the crank pulley off. Make sure you stop when it gets hard, as the pulley will have hit the crank bolt. Remove the puller and crank bolt, and gently lever the balancer the rest of the way off.

Image

-Wipe the area around the balancer seal to ensure no junk gets in there and wipe off the end of the crank and the inside of the balancer.

Image
Image

Look at your car. Now back to mine. Now back to yours. Now back to mine. Sadly, yours isn't mine. But if you stopped buying dodgy cars and bought an ED, yours could be like mine. Look down. Back up. Where are you? ...You're on BoostedFalcon, reading the signature your signature could be like! Anything is possible when your car looks like my car... I'm on a computer.
User avatar
Rollin
Melting Pistons
 
Posts: 7933
Joined: July 15th, 2007, 4:35 pm
Location: Brisbane - Driving around in a metal and glass case of emotion!
Has Liked: 327 times
Been Liked: 751 times

1994 Ford Falcon

Re: Serpentine conversion tutorial...lucky I kept a copy, eh?

Postby Rollin » December 20th, 2007, 6:00 pm

-Apply a thin film of engine oil to the outside of the balancer where the seal runs on it and apply a thin film of UltraBlue on the inside to stop any leaks.

-Align the keyway on the new balancer with the keyway on the crank and tap it on enough to ensure it is going on correctly and get the crank bolt in a couple of turns (at least 3) before you start winding the balancer on with the crank bolt.

-Wind the balancer on with the crank bolt and do it up fairly tight, somewhere around 70Nm should be ok.

-Put a thin layer of Permatex No3 or UltraBlue on the water pump gasket and fit the water pump. Fit all 4 bolts, as there are no brackets that need to be attached to the pump.

-Next is the alternator bracket - this needs to be ground down to fit the EA/D timing cover, as there is a brace cast into the timing case which fouls on the alternator bracket, you will need to trial fit the bracket a few times to make sure you have ground off enough.

Image

Use a file to take off a little of the timing cover where the bolt hole is...its a horrible mess down there on my car - the following pic was taken AFTER I cleaned it up a bit!

Image

This is the bracket fitted to the car - the balancer is the thing at the bottomw of the pic.

Image

Make sure when you put the bracket against the block and the front 10mm bolt in, that the two faces sit flush. If they don't sit flush you haven't ground enough off.

-Fit the alternator and attach the wiring. The EB plug on my car went straight into the EF alternator I had, I hope the rest of you are as lucky.

-Get your old (or use a new one) EA/D bottom radiator hose and the new EF one. The EF one obviously has to go to the water pump and the EB one to the radiator.

Measure carefully and cut the hoses in the same spot. you will need to use side-cutters to cut the spring inside - make sure you keep the spring in both sections of the hose, it stops the hose from sucking in when the car is running.

-Join the two hoses together using the adaptor, making sure you join them in the correct orientation so there is no stress on the hose when it is fitted to the car. I used two hose clamps on the smaller section just because I had them spare.

Image
Image

Look at your car. Now back to mine. Now back to yours. Now back to mine. Sadly, yours isn't mine. But if you stopped buying dodgy cars and bought an ED, yours could be like mine. Look down. Back up. Where are you? ...You're on BoostedFalcon, reading the signature your signature could be like! Anything is possible when your car looks like my car... I'm on a computer.
User avatar
Rollin
Melting Pistons
 
Posts: 7933
Joined: July 15th, 2007, 4:35 pm
Location: Brisbane - Driving around in a metal and glass case of emotion!
Has Liked: 327 times
Been Liked: 751 times

1994 Ford Falcon

Re: Serpentine conversion tutorial...lucky I kept a copy, eh?

Postby Rollin » December 20th, 2007, 6:01 pm

-Fit the AC compressor. I had some problems getting bolts the correct length here. I think I ended up using one from the EB setup and two from the EF one, though one of the EF ones was about 5mm too long, so I had to put 4 washers underneath it to ensure it went tight before it bottomed out.

Its also a good idea to use new AC o-rings, but if yours aren't compression-set then you can re-use them. Make sure you keep them clean and don't let any engine oil, grease or thinners or anything on them.

-Now fit the tensioner. It has 3 long bolts that go deep into the block, so use the longest ones you can but again, ensure they are getting tight against the tensioner before they bottom out in the block.

-Fit the power steer pump bracket. The front of the bracket has 3 sliding mounts in it, I found it was easiest to tap them flush with the back of the bracket with a hammer, then put the bolts in the side of the block/head first, start the front bolts to align everything, do the side ones up tight and then do the front ones up tight.

-Fit the power steer pump, using a new o-ring for the high pressure line and fill with fluid.

-Fit the drive belt as shown:

Image

Image

-Refit the radiator, hoses etc and thermofans and fill the car with new coolant.

-Refit the intake piping, airbox etc, make sure the car is out of gear and start it, check the power steer pump oil level when the car is running and top up if necessary, also make sure you keep an eye on the coolant level.

-Check for leaks and anything loose and go for a test drive.

-Get a workshop to refill your AC system.

-Hopefully smile at a job well done :D
Image

Look at your car. Now back to mine. Now back to yours. Now back to mine. Sadly, yours isn't mine. But if you stopped buying dodgy cars and bought an ED, yours could be like mine. Look down. Back up. Where are you? ...You're on BoostedFalcon, reading the signature your signature could be like! Anything is possible when your car looks like my car... I'm on a computer.
User avatar
Rollin
Melting Pistons
 
Posts: 7933
Joined: July 15th, 2007, 4:35 pm
Location: Brisbane - Driving around in a metal and glass case of emotion!
Has Liked: 327 times
Been Liked: 751 times

1994 Ford Falcon

Re: Serpentine conversion tutorial...lucky I kept a copy, eh?

Postby Rollin » December 20th, 2007, 6:03 pm

Other stuff


One good reason to keep your coolant fresh - my old water pump is around 50,000km old IIRC, and still looks practically new :)

Image

Prior to fitting the serpentine setup the system voltage of the car was wildly variable - 14v with everything off, down to 11.5v with both fuel pumps, thermos, headlights, and stereo on (even quietly) throw some windscreen wipers and an indicator into the mix and the thing nearly stopped! Now I can have everything running and it still only drops to 13.8v, from a no-load 14.5v.

Image

THIS WAS SOOOO WORTH THE EFFORT!

HTH :)

.........................................................................................................................................................................

Shit yeh, looks like all the pics still work :D
Image

Look at your car. Now back to mine. Now back to yours. Now back to mine. Sadly, yours isn't mine. But if you stopped buying dodgy cars and bought an ED, yours could be like mine. Look down. Back up. Where are you? ...You're on BoostedFalcon, reading the signature your signature could be like! Anything is possible when your car looks like my car... I'm on a computer.
User avatar
Rollin
Melting Pistons
 
Posts: 7933
Joined: July 15th, 2007, 4:35 pm
Location: Brisbane - Driving around in a metal and glass case of emotion!
Has Liked: 327 times
Been Liked: 751 times

1994 Ford Falcon

Re: Serpentine conversion tutorial...lucky I kept a copy, eh?

Postby Malakai » December 20th, 2007, 7:19 pm

Nice work Rollin!

I don't remember you having any trouble with belts on that car but exactly how reliable was it? I ask because I imagine if you get some of the grinding for the brackets wrong it could potentially cause it to throw belts or wear them unevenly... I guess what I'm asking is how exact does the grinding have to be?
FG G6E Turbo MkII - Nizpro Stage 3 - 364 rwkW - 11.63 sec @ 118 mp/h | I like the dark, I love the dark, but I hate nature. Image
User avatar
Malakai
Double Clutching
 
Posts: 5251
Joined: July 21st, 2007, 1:23 pm
Location: Brisbane
Has Liked: 0 time
Been Liked: 32 times

Re: Serpentine conversion tutorial...lucky I kept a copy, eh?

Postby Rollin » December 21st, 2007, 1:07 am

It doesn't break the planet of you take too much off, and you might have slight belt alignment problems if you don't take enough off. I recall in the thread on AFF that some people said they didn't have to grind anything at all, so maybe there is a slight difference in the timing covers of some cars :S

I used to spit alternator belts probably at least once a year, if not more before the conversion, and also had a lot of trouble at one stage getting the bloody power steer belt to stay on (AC Delco belts FTW, cheap as chips, worked better than bosch ones for me, which is a big call because I like Bosch stuff) So far, no probs on the red car or the white one with the serpentine setup. :)

I'd imagine that auto cars would be more reliable than manuals with the 3 belt setup, because the belts take a lot of strain during fast engine speed changes (like quick shifts and launches, which I was doing all the freakin' time) which you don't get as much with autos.
Image

Look at your car. Now back to mine. Now back to yours. Now back to mine. Sadly, yours isn't mine. But if you stopped buying dodgy cars and bought an ED, yours could be like mine. Look down. Back up. Where are you? ...You're on BoostedFalcon, reading the signature your signature could be like! Anything is possible when your car looks like my car... I'm on a computer.
User avatar
Rollin
Melting Pistons
 
Posts: 7933
Joined: July 15th, 2007, 4:35 pm
Location: Brisbane - Driving around in a metal and glass case of emotion!
Has Liked: 327 times
Been Liked: 751 times

1994 Ford Falcon

Re: Serpentine conversion tutorial...lucky I kept a copy, eh?

Postby syko4d » December 21st, 2007, 8:00 am

mate thats excellent

next on the to do list
syko4d
Banned
 
Posts: 392
Joined: November 10th, 2007, 10:58 am
Location: orange nsw
Has Liked: 0 time
Been Liked: 0 time

Re: Serpentine conversion tutorial...lucky I kept a copy, eh?

Postby G3R3N » December 25th, 2007, 11:42 am

Rollin = God of walk-throughs
Great read, cheers
User avatar
G3R3N
Breaking Traction
 
Posts: 1989
Joined: August 22nd, 2007, 9:11 pm
Location: Melbourne
Has Liked: 0 time
Been Liked: 2 times

Re: Serpentine conversion tutorial...lucky I kept a copy, eh?

Postby dodgy20 » December 30th, 2007, 10:39 pm

hi rollin, can i bolt a au alternator to a eseries block when doing single belt conversion. is the au alternator seperate from the au alternator bracket and will a au alternator bolt up to the el alternator brackets and when i transfer the au alternator over to the au engine can i take the au alternator off the el bracket and bolt it back to the au bracket.

can you please give me a price on the following at pick apart/upullit

ef/el compressor

ef/el/au water pump

ef/el/au power steer pump

au alternator

el alternator

ef/el/au harmonic balancer

xh belt tensioner

all the bolts to bolt the gear back to the ed engine And the ef/el timing cover
dodgy20
Banned
 
Posts: 22
Joined: November 29th, 2007, 12:39 pm
Has Liked: 0 time
Been Liked: 0 time

Re: Serpentine conversion tutorial...lucky I kept a copy, eh?

Postby Rollin » December 30th, 2007, 11:26 pm

I couldn't tell you prices for sure, it might be better to just go to a wreckers and see if they will seperate all the stuff off an EF/EL motor for you, that way you know you have everything. (you will most likely need to get a tensioner new from ford, as the XH ute ones are like hens teeth). It's probably a good idea to get the water pump new as well - trying to get a second hand one to seal is a bit of a mission.

I believe the AU alternator does not fit the EF bracket and vice-versa, so you will need to get alternators with matching brackets, and use the one that matches the engine.

It will probably end up being a much cheaper option to just buy an AU motor with all the serpentine crap still on it, and then get a tensioner and belt, and put the ED manifold on it, than comverting your motor, then buying an AU motor, then swapping all the crap over.

dodgy20 wrote:will a au alternator/au alternator bracket fit a e series block and a el alternator/bracket fit a au block


I'm pretty sure that only an AU alternator will fit an AU bracket, and that an AU bracket will only fit an AU block, which means that I'm also fairly sure that an EF/EL alternator will only fit an EF/EL bracket and pre-AU block...
Image

Look at your car. Now back to mine. Now back to yours. Now back to mine. Sadly, yours isn't mine. But if you stopped buying dodgy cars and bought an ED, yours could be like mine. Look down. Back up. Where are you? ...You're on BoostedFalcon, reading the signature your signature could be like! Anything is possible when your car looks like my car... I'm on a computer.
User avatar
Rollin
Melting Pistons
 
Posts: 7933
Joined: July 15th, 2007, 4:35 pm
Location: Brisbane - Driving around in a metal and glass case of emotion!
Has Liked: 327 times
Been Liked: 751 times

1994 Ford Falcon

Re: Serpentine conversion tutorial...lucky I kept a copy, eh?

Postby dodgy20 » December 31st, 2007, 9:23 am

will a ed alternator plug plug straight into a ef/el/au alternator and will a ef/el alternator plug plug staight into a au alternator
dodgy20
Banned
 
Posts: 22
Joined: November 29th, 2007, 12:39 pm
Has Liked: 0 time
Been Liked: 0 time

Re: Serpentine conversion tutorial...lucky I kept a copy, eh?

Postby OED666 » December 31st, 2007, 10:11 am

dodgy20, your not getting any better with your posts. are you still in primary school?

the ed alternator plug will fit EF/EL and AU alternators.
Image

Sundeep wrote:even though Falcon manuals are rough as guts. I just like smashing and skating through gears.
User avatar
OED666
Hitting N2O
 
Posts: 3792
Joined: August 3rd, 2007, 8:20 am
Location: At your mum's house, and she loves it!
Has Liked: 194 times
Been Liked: 121 times

1994 Ford Falcon

Re: Serpentine conversion tutorial...lucky I kept a copy, eh?

Postby Rollin » July 11th, 2008, 11:17 pm

OK, so a few people lately have been asking lots of questions about using a log manifold on an AU motor, and what bits you need for the compressor and which compressor you need, so I took some pics the other night to make it a bit clearer, cause I confuse the crap out of myself trying to remember what bit fits what other bit. I'll prob bump a heap of other threads (any AU conversion ones I can find for instance) to make this little bit of info easier to find.

(I've also realised that none of the pics in this thread work any more :( I'll have to upload all the pics to photobucket and edit my previous posts at some stage :()

OK, so, what we have is an AU motor, with no ac compressor fitted (no sump either, but that doesn't matter)

The 3 red circles are around the bolt holes you want to use. You will need the original 3 long bolts that hold the compressor to the engine on an EF, and you will need an EB bracket and the 2 short bolts that bolt the bracket to the block on an EB.

Image

First off, mount the bracket to the block using the short bolts (with the bracket turned so the threaded holes on the bracket are at the bottom), and you will notice there is a big gap between the block and the bracket at the top. The red circles are the bolts you want to fit, the blue circle is where you put the washers.

Image

Loosen the two bolts you just fitted about half a turn to one full turn, and get a stack of washers that will j-u-u-u-st fit between the bracket and the block, so that when you tighten the lower bolts the washers are captive or are at least a very very close fit.

Image

It is not important to fit washers and a bolt to the rear mount point, as the EF compressor doesn't use it, but if you can find a bolt of the appropriate size you can stick one in there with the right number of washers if it will help you sleep at night :)

Image

Use the long bolts that come with the EB compressor to bolt the EF one to the bracket, you may or may not need so use a bunch of washers to ensure the bolts go tight before they run out of thread or bottom out on the sump...

Anyway, I hope that helps :)
Last edited by Rollin on July 12th, 2008, 7:33 pm, edited 1 time in total.
Image

Look at your car. Now back to mine. Now back to yours. Now back to mine. Sadly, yours isn't mine. But if you stopped buying dodgy cars and bought an ED, yours could be like mine. Look down. Back up. Where are you? ...You're on BoostedFalcon, reading the signature your signature could be like! Anything is possible when your car looks like my car... I'm on a computer.
User avatar
Rollin
Melting Pistons
 
Posts: 7933
Joined: July 15th, 2007, 4:35 pm
Location: Brisbane - Driving around in a metal and glass case of emotion!
Has Liked: 327 times
Been Liked: 751 times

1994 Ford Falcon

Re: Serpentine conversion tutorial...lucky I kept a copy, eh?

Postby travs ea-xr6 » July 12th, 2008, 4:08 pm

Good stuff mate hellped heaps ;)

Did you use a ef compresor braket and ef compresor ;)
User avatar
travs ea-xr6
Full Boost
 
Posts: 2979
Joined: March 7th, 2008, 3:43 pm
Location: Melbourne - Vic
Has Liked: 17 times
Been Liked: 8 times

Re: Serpentine conversion tutorial...lucky I kept a copy, eh?

Postby Rollin » July 12th, 2008, 7:34 pm

Haha, I just re-read my post and realised I never actually specified which bracket to use. EB bracket people! Post edited to rectify brain failure.
Image

Look at your car. Now back to mine. Now back to yours. Now back to mine. Sadly, yours isn't mine. But if you stopped buying dodgy cars and bought an ED, yours could be like mine. Look down. Back up. Where are you? ...You're on BoostedFalcon, reading the signature your signature could be like! Anything is possible when your car looks like my car... I'm on a computer.
User avatar
Rollin
Melting Pistons
 
Posts: 7933
Joined: July 15th, 2007, 4:35 pm
Location: Brisbane - Driving around in a metal and glass case of emotion!
Has Liked: 327 times
Been Liked: 751 times

1994 Ford Falcon

Re: Serpentine conversion tutorial...lucky I kept a copy, eh?

Postby travs ea-xr6 » July 12th, 2008, 11:10 pm

And what compresor did you use.Could you use a el compresor braket and el compresor ;)
User avatar
travs ea-xr6
Full Boost
 
Posts: 2979
Joined: March 7th, 2008, 3:43 pm
Location: Melbourne - Vic
Has Liked: 17 times
Been Liked: 8 times

Re: Serpentine conversion tutorial...lucky I kept a copy, eh?

Postby Rollin » November 6th, 2008, 10:43 pm

Uselessly late reply, but yes, you should be able to.

BTW: I think the part number for the Dayco X series tensioner is "132002" - saw it in a catalogue by chance today, thought I'd throw it up for future reference...
Image

Look at your car. Now back to mine. Now back to yours. Now back to mine. Sadly, yours isn't mine. But if you stopped buying dodgy cars and bought an ED, yours could be like mine. Look down. Back up. Where are you? ...You're on BoostedFalcon, reading the signature your signature could be like! Anything is possible when your car looks like my car... I'm on a computer.
User avatar
Rollin
Melting Pistons
 
Posts: 7933
Joined: July 15th, 2007, 4:35 pm
Location: Brisbane - Driving around in a metal and glass case of emotion!
Has Liked: 327 times
Been Liked: 751 times

1994 Ford Falcon

Re: Serpentine conversion tutorial...lucky I kept a copy, eh?

Postby Mr_White_Ea » July 24th, 2009, 9:26 pm

I only have two questions.

1st question is will this conversion be possible on a 3.9 litre mpfi six with lpg.
2nd question is how much would it roughly cost ?
MR_White_EA
Allways slippery when dry when your in a FORD.
E series Falcons Rock
Only one way to tag a road and thats with doubles :D
User avatar
Mr_White_Ea
Idling
 
Posts: 161
Joined: July 24th, 2009, 8:08 pm
Location: Victoria the place to be
Has Liked: 0 time
Been Liked: 0 time

Re: Serpentine conversion tutorial...lucky I kept a copy, eh?

Postby Bazza J » July 24th, 2009, 9:50 pm

Mr_White_Ea wrote:I only have two questions.

1st question is will this conversion be possible on a 3.9 litre mpfi six with lpg.

yes this will work on all EA-ED motors
Daily:1993 Toyota 4 Runner, 5 speed Manual, 2.8L N/A diesel
Project: Ford 1976 ZH Fairlane Marquis 351 Clevo & C4 shiftkitted auto - in the build
User avatar
Bazza J
Cruising
 
Posts: 400
Joined: February 1st, 2008, 7:00 pm
Location: Tamworth NSW
Has Liked: 0 time
Been Liked: 0 time

Re: Serpentine conversion tutorial...lucky I kept a copy, eh?

Postby Dezza » July 24th, 2009, 10:38 pm

Mr_White_Ea wrote:I only have two questions.

1st question is will this conversion be possible on a 3.9 litre mpfi six with lpg.
2nd question is how much would it roughly cost ?

I did the conversion on my 3.9 litre. All up it probably came to about $200 but I think I got a good deal there. It was well worth it as my car loved spitting off the power steering belt. I snapped one alternator belt, killed 2 aircon belts, and probably bought about 10 powersteering belts by the end! I never actually snapped a powersteering belt, but it kept stretching them, putting cracks in them, and they just wouldn't stay on!


btw Rollin, the waterpump that came off the car looked that good too! I'd never changed it in the 7 years I'd had the car, always used coolant, and it was still in awesome condition!
Project: 1990 EAII Ford Fairmont Ghia - Platinum Silver
4.0i XR6 motor with BBM, T5 manual, Scorcher bar, sprint kit, XR front & rear lip, SVO rims, EL handles, mirrors & fuel flap, extractors, 2.5" exhaust, heaps more

Daily 2010 FG XR50T ute - Lightning Strike
6 speed manual, Leather, 19" option rims, hardlid
User avatar
Dezza
Breaking Traction
 
Posts: 1588
Joined: July 15th, 2007, 7:10 pm
Location: Glen Waverley
Has Liked: 6 times
Been Liked: 5 times

1990 Ford Fairmont

Re: Serpentine conversion tutorial...lucky I kept a copy, eh?

Postby Mr_White_Ea » July 25th, 2009, 6:34 pm

Thanks for letting me know that Bazza J and Dezza.

Awsome thread this is a mod worth deffinently looking into.
MR_White_EA
Allways slippery when dry when your in a FORD.
E series Falcons Rock
Only one way to tag a road and thats with doubles :D
User avatar
Mr_White_Ea
Idling
 
Posts: 161
Joined: July 24th, 2009, 8:08 pm
Location: Victoria the place to be
Has Liked: 0 time
Been Liked: 0 time

Re: Serpentine conversion tutorial...lucky I kept a copy, eh?

Postby onICEef95 » July 27th, 2009, 10:50 pm

sorry for the noob question but, what does this mod do to your car?
Image
my name is Mark
User avatar
onICEef95
Cruising
 
Posts: 246
Joined: May 27th, 2009, 2:13 pm
Location: Narre Warren North, VIC
Has Liked: 0 time
Been Liked: 0 time

1996 Ford Futura

Re: Serpentine conversion tutorial...lucky I kept a copy, eh?

Postby Mr_White_Ea » July 28th, 2009, 12:17 am

If you have a ea-ed series falcon then you got a 3 belt setup for power steering and aircond and alternator and by doing this mod you get a single belt setup which has a tensioner on it which means you dont have to manualy tension all the belts up yourself plus you only pay for one belt and not three. Not to mention you dont get as much belt slip and the el alternator is 110amp not 75amp like the ea-ed's have.

Hope that answers your question.
MR_White_EA
Allways slippery when dry when your in a FORD.
E series Falcons Rock
Only one way to tag a road and thats with doubles :D
User avatar
Mr_White_Ea
Idling
 
Posts: 161
Joined: July 24th, 2009, 8:08 pm
Location: Victoria the place to be
Has Liked: 0 time
Been Liked: 0 time

Re: Serpentine conversion tutorial...lucky I kept a copy, eh?

Postby SNR » July 28th, 2009, 12:31 pm

Also lets you run the better EF/L alternator if you have a big stereo (or thermofans etc) this can be a real help.
Straights are for fast cars... Turns are for fast drivers

http://www.flickr.com/photos/silencer_rh - View My Photos on Flickr.com
http://www.boostedfalcon.net/viewtopic.php?f=3&t=7390 - My EBII Fairmont Sickmachine.
http://www.e21build.com - My BMW E21/Ford 4.0 I6 Drift/Rally Project Car
SNR
Full Boost
 
Posts: 2830
Joined: July 19th, 2007, 6:47 pm
Location: Warrnambool, VIC
Has Liked: 174 times
Been Liked: 100 times

Re: Serpentine conversion tutorial...lucky I kept a copy, eh?

Postby Amon » August 14th, 2009, 1:27 am

u say the compressor sits in a lower position on an ea-ed compared to an ef/el. Im assumin then the compressor mounting brackets are different? And is that because of the log manifold?

My question is, if i fit a bbm, will i b able to fit an ef/el mounting bracket for the compressor and an ef/el tensioner? Instead of an xh tensioner??
Beef or chicken ming mongs
User avatar
Amon
Breaking Traction
 
Posts: 1426
Joined: October 16th, 2007, 12:23 pm
Location: Eastern Suburbs, Melbourne
Has Liked: 0 time
Been Liked: 2 times

1994 Ford XR6

Re: Serpentine conversion tutorial...lucky I kept a copy, eh?

Postby travs ea-xr6 » August 14th, 2009, 8:12 am

yer if you fit a bbm you can practicly use all the acceceries off a el,ef engine
User avatar
travs ea-xr6
Full Boost
 
Posts: 2979
Joined: March 7th, 2008, 3:43 pm
Location: Melbourne - Vic
Has Liked: 17 times
Been Liked: 8 times

Re: Serpentine conversion tutorial...lucky I kept a copy, eh?

Postby Amon » August 14th, 2009, 11:33 am

sweet cheers mate
Beef or chicken ming mongs
User avatar
Amon
Breaking Traction
 
Posts: 1426
Joined: October 16th, 2007, 12:23 pm
Location: Eastern Suburbs, Melbourne
Has Liked: 0 time
Been Liked: 2 times

1994 Ford XR6

Re: Serpentine conversion tutorial...lucky I kept a copy, eh?

Postby travs ea-xr6 » August 14th, 2009, 3:29 pm

im prity sure you have to slightly play around with the alternator mounting tho but its only a few grinds here and there ;)
User avatar
travs ea-xr6
Full Boost
 
Posts: 2979
Joined: March 7th, 2008, 3:43 pm
Location: Melbourne - Vic
Has Liked: 17 times
Been Liked: 8 times

Re: Serpentine conversion tutorial...lucky I kept a copy, eh?

Postby Dezza » August 14th, 2009, 3:53 pm

travs ea-xr6 wrote:im prity sure you have to slightly play around with the alternator mounting tho but its only a few grinds here and there ;)

On the EA I just had to grind a little bit off the alternator bracket to clear the timing case. Interestingly though, I know of people who have done the conversion on an EBII and some EDs who didn't need to do this.

So Scott, I'm guessing being an ED the bracket will bolt straight up.
Project: 1990 EAII Ford Fairmont Ghia - Platinum Silver
4.0i XR6 motor with BBM, T5 manual, Scorcher bar, sprint kit, XR front & rear lip, SVO rims, EL handles, mirrors & fuel flap, extractors, 2.5" exhaust, heaps more

Daily 2010 FG XR50T ute - Lightning Strike
6 speed manual, Leather, 19" option rims, hardlid
User avatar
Dezza
Breaking Traction
 
Posts: 1588
Joined: July 15th, 2007, 7:10 pm
Location: Glen Waverley
Has Liked: 6 times
Been Liked: 5 times

1990 Ford Fairmont

Re: Serpentine conversion tutorial...lucky I kept a copy, eh?

Postby Amon » August 14th, 2009, 5:48 pm

aight hope so... less work for me the better haha

only reason ill hav to change thermostat housing and top radiator hose is if i use the el intake yeh?

and did u do urs urself dezza?
Beef or chicken ming mongs
User avatar
Amon
Breaking Traction
 
Posts: 1426
Joined: October 16th, 2007, 12:23 pm
Location: Eastern Suburbs, Melbourne
Has Liked: 0 time
Been Liked: 2 times

1994 Ford XR6

Re: Serpentine conversion tutorial...lucky I kept a copy, eh?

Postby Dezza » August 14th, 2009, 5:55 pm

Yeah, I did it myself. I did a shit job of fitting the water pump so Kev fixed that one for me but other than that I did it myself.

With the thermostat housing, you might be able to stick with the EA-ED one but the EF-EL one is neater and also allows you to fit the belt cover. It's only the top half that needs changing. EDIT: looking here, there may possibly be clearance issues between the tensioner and the hose if you stick with the ED thermostat housing.
Image
Project: 1990 EAII Ford Fairmont Ghia - Platinum Silver
4.0i XR6 motor with BBM, T5 manual, Scorcher bar, sprint kit, XR front & rear lip, SVO rims, EL handles, mirrors & fuel flap, extractors, 2.5" exhaust, heaps more

Daily 2010 FG XR50T ute - Lightning Strike
6 speed manual, Leather, 19" option rims, hardlid
User avatar
Dezza
Breaking Traction
 
Posts: 1588
Joined: July 15th, 2007, 7:10 pm
Location: Glen Waverley
Has Liked: 6 times
Been Liked: 5 times

1990 Ford Fairmont

Re: Serpentine conversion tutorial...lucky I kept a copy, eh?

Postby Amon » August 14th, 2009, 6:19 pm

alrite cheers may aswell use the ef/el one then i can use the cover :)
Beef or chicken ming mongs
User avatar
Amon
Breaking Traction
 
Posts: 1426
Joined: October 16th, 2007, 12:23 pm
Location: Eastern Suburbs, Melbourne
Has Liked: 0 time
Been Liked: 2 times

1994 Ford XR6

Re: Serpentine conversion tutorial...lucky I kept a copy, eh?

Postby travs ea-xr6 » August 14th, 2009, 6:35 pm

do bbm conversion while your at it to man so worth it in the long run ;)
User avatar
travs ea-xr6
Full Boost
 
Posts: 2979
Joined: March 7th, 2008, 3:43 pm
Location: Melbourne - Vic
Has Liked: 17 times
Been Liked: 8 times

Re: Serpentine conversion tutorial...lucky I kept a copy, eh?

Postby Amon » August 15th, 2009, 8:27 pm

yeh kev said its worth it but i dunno... guess i could do it seein as ill b chuckin an el ecu in..
Beef or chicken ming mongs
User avatar
Amon
Breaking Traction
 
Posts: 1426
Joined: October 16th, 2007, 12:23 pm
Location: Eastern Suburbs, Melbourne
Has Liked: 0 time
Been Liked: 2 times

1994 Ford XR6

Re: Serpentine conversion tutorial...lucky I kept a copy, eh?

Postby eb pete » August 17th, 2009, 8:01 pm

Do the XH or EF/EL bolts have a larger diameter at the head of the bolt to match the hole size in the tensioner? I have an XH tensioner and got 3 bolts with it(from the wreckers) all longer then the normal timing cover bolts but there is alot of play in the tensioner as the holes are alot bigger then the bolts, or is there 3 dowels that line it up and hold it firmly?

Thanks
User avatar
eb pete
Spooling Up
 
Posts: 568
Joined: July 17th, 2007, 7:12 pm
Has Liked: 0 time
Been Liked: 0 time

Re: Serpentine conversion tutorial...lucky I kept a copy, eh?

Postby Dezza » August 17th, 2009, 8:14 pm

With mine, once I'd tightened the bolts enough, there was no play in it. There aren't any dowels. I just used EF bolts and It's tight as.
Project: 1990 EAII Ford Fairmont Ghia - Platinum Silver
4.0i XR6 motor with BBM, T5 manual, Scorcher bar, sprint kit, XR front & rear lip, SVO rims, EL handles, mirrors & fuel flap, extractors, 2.5" exhaust, heaps more

Daily 2010 FG XR50T ute - Lightning Strike
6 speed manual, Leather, 19" option rims, hardlid
User avatar
Dezza
Breaking Traction
 
Posts: 1588
Joined: July 15th, 2007, 7:10 pm
Location: Glen Waverley
Has Liked: 6 times
Been Liked: 5 times

1990 Ford Fairmont

Re: Serpentine conversion tutorial...lucky I kept a copy, eh?

Postby eb pete » August 26th, 2009, 7:38 pm

Well I thought I bought a complete conversion but turns out I'm missing alot of things :banghead: 
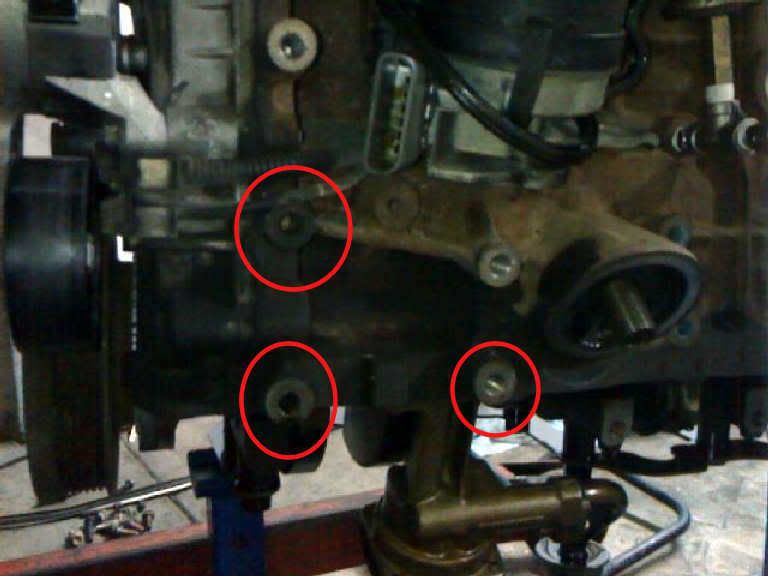
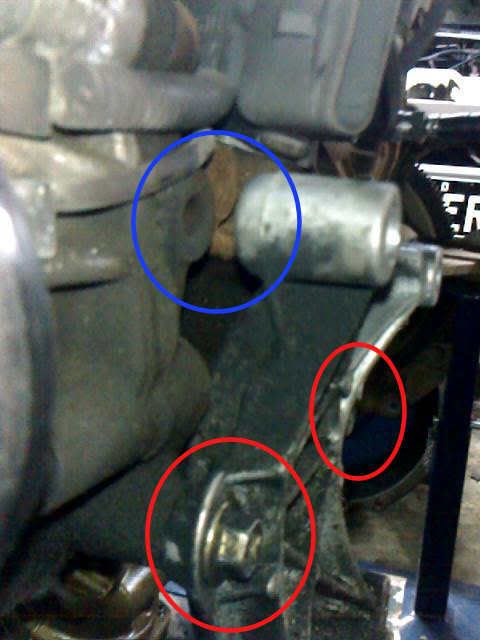
. I bought a new water pump and pully, is the pully just a press fit and no bolt needed? Can I use the original AC compressor(EBII) on the same block but using a BBM? and lastly where the F#^K do the braces go? I have the 2 in the middle of Rollin's pic and a little one with a small thread on it?

I think I'm missing alot looking at Rollin's 1st pic.
User avatar
eb pete
Spooling Up
 
Posts: 568
Joined: July 17th, 2007, 7:12 pm
Has Liked: 0 time
Been Liked: 0 time

Re: Serpentine conversion tutorial...lucky I kept a copy, eh?

Postby SNR » August 26th, 2009, 9:04 pm

Pete, look at my thread in the build section, I have a really good photo of the only two braces you need (and where they go)
Straights are for fast cars... Turns are for fast drivers

http://www.flickr.com/photos/silencer_rh - View My Photos on Flickr.com
http://www.boostedfalcon.net/viewtopic.php?f=3&t=7390 - My EBII Fairmont Sickmachine.
http://www.e21build.com - My BMW E21/Ford 4.0 I6 Drift/Rally Project Car
SNR
Full Boost
 
Posts: 2830
Joined: July 19th, 2007, 6:47 pm
Location: Warrnambool, VIC
Has Liked: 174 times
Been Liked: 100 times

Next

Return to Tutorials

Who is online

Users browsing this forum: No registered users